
Auction: 24112 - Orders, Decorations and Medals - e-Auction
Lot: 539
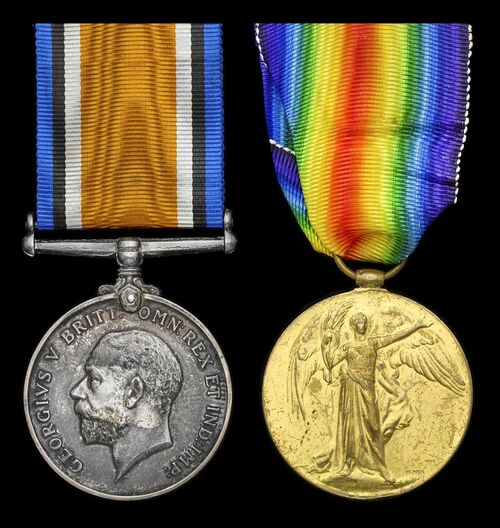
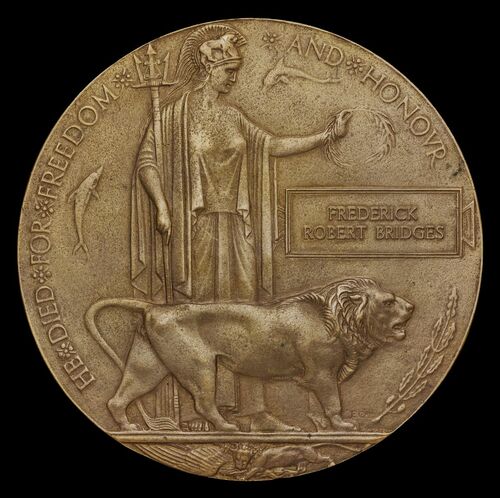
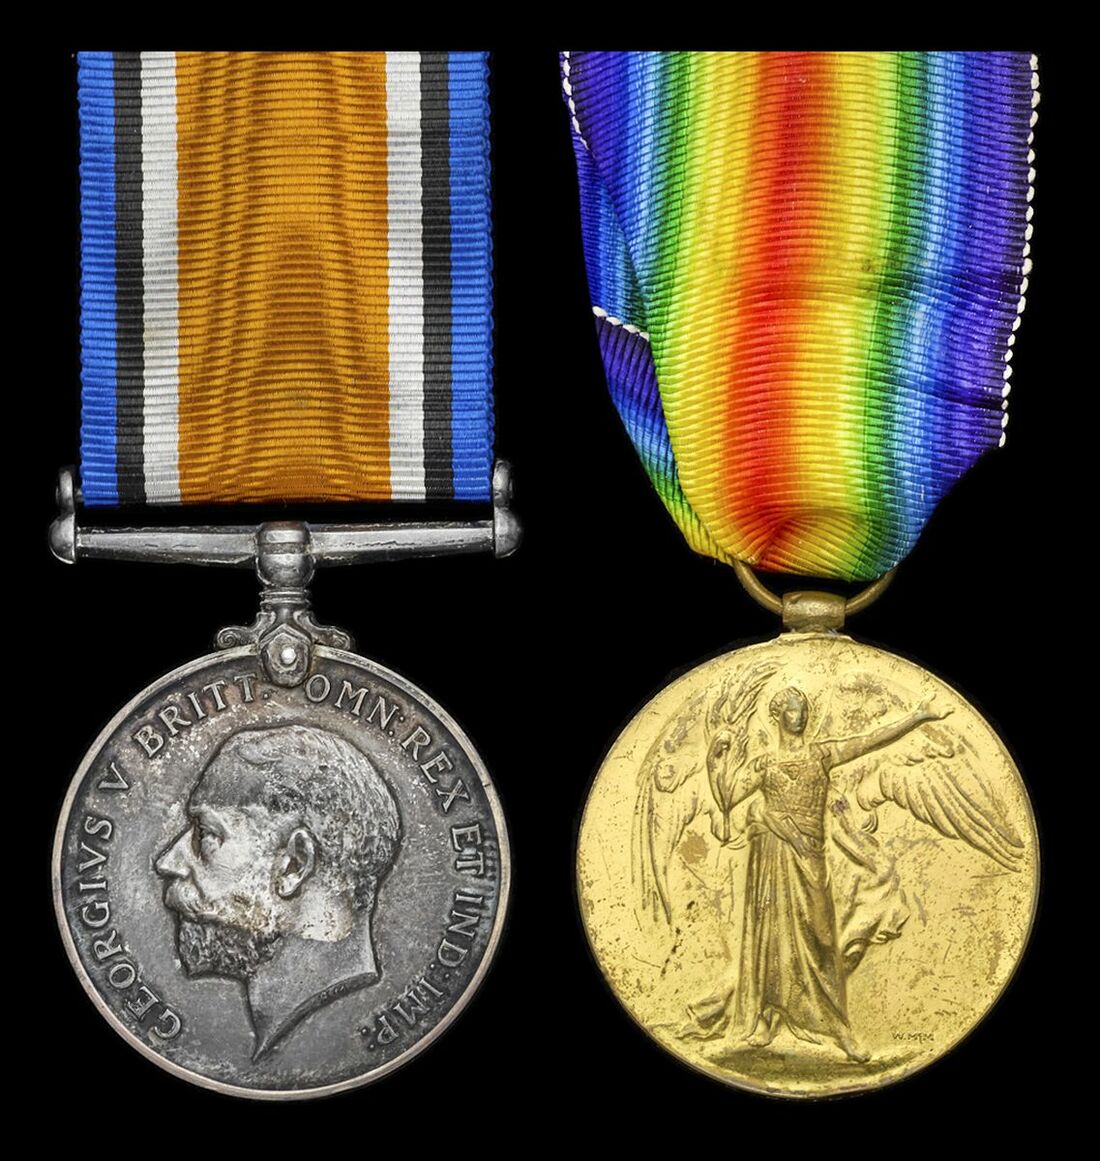
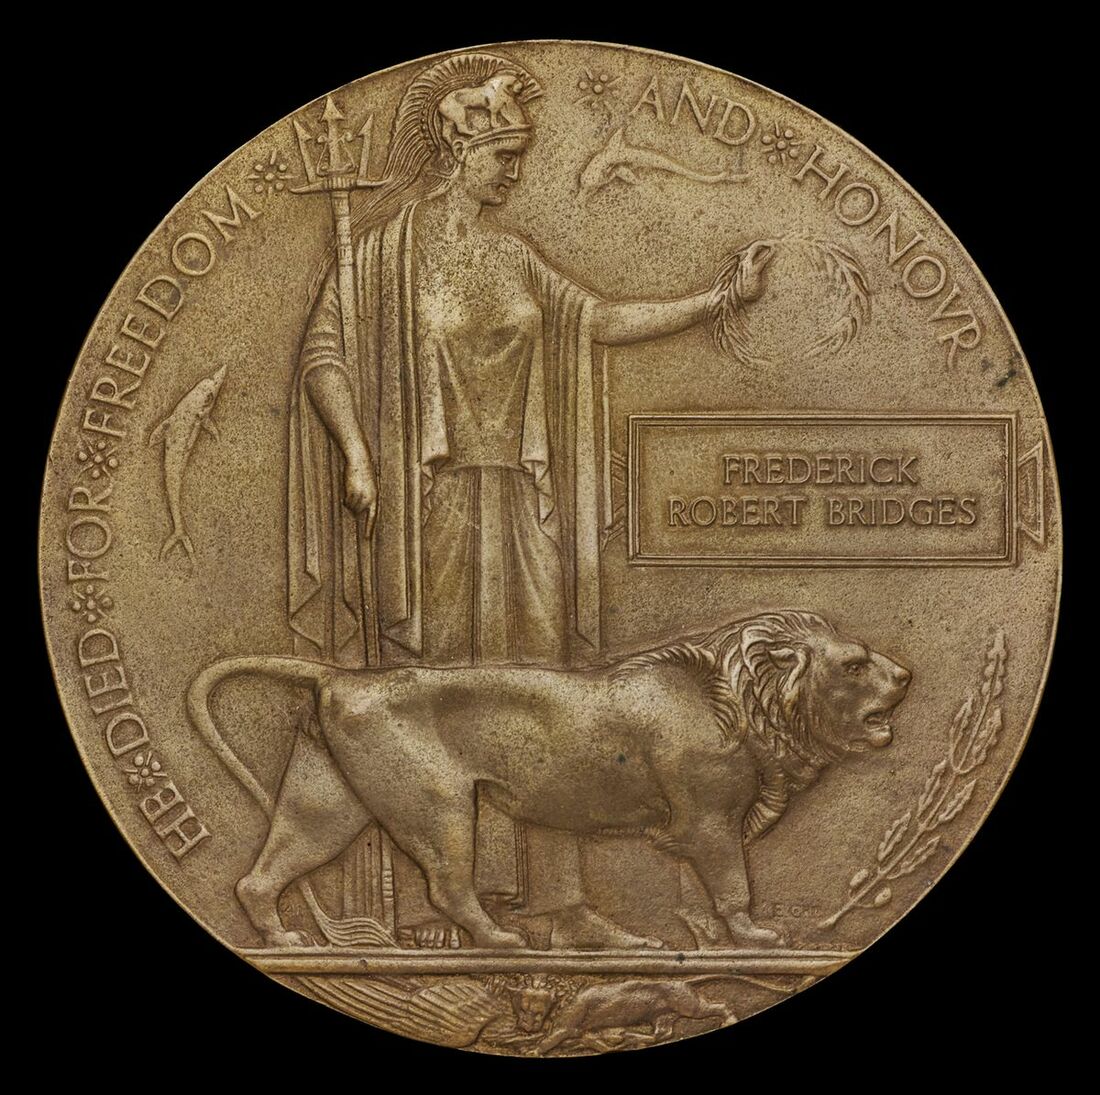
A Great War casualty pair awarded to Private F. R. Bridges, Worcestershire Regiment, who was killed in action on 25 January 1917
British War and Victory Medals (30866 Pte F. R. Bridges. Worc. R.); Memorial Plaque (Frederick Robert Bridges), good very fine (3)
Frederick Robert Bridges was born circa January-March 1888 in Kidderminster, Worcestershire. He married Ellen Donoven in Kidderminster in spring 1914 and settled down to married life, living in Kidderminster at 21 Hoo Lane, and was employed as a sign writer.
Bridges enlisted in December 1915 under Lord Derby's scheme. Lord Derby, as Minister of Recruitment, devised a scheme which encouraged men to register voluntarily for military service, only to be called-up when necessary. As further incentive it was guaranteed that married men would not be enlisted until all single men had been mobilised. Bridges was called up for active service in May 1916 and was posted to the 9th Battalion, Worcestershire Regiment after training.
9th (Service) Battalion
The 9th Battalion was formed at Worcester in August 1914 and came under orders of 39th Brigade in the 13th (Western) Division. It moved to Tidworth but by January 1915 was in billets in Basingstoke. Moving to Blackdown, Aldershot in February, it sailed from Avonmouth in June and landed at Gallipoli the next month. In January 1916, the Division was evacuated from Gallipoli and moved to Egypt. On 12 February 1916 they moved to Mesopotamia to join the force being assembled near Sheikh Sa'ad for the relief of the besieged garrison at Kut al Amara. They joined the Tigris Corps on 27 March and were in action in the unsucessful attempts to relieve Kut. Bridges likely joined his Battalion in autumn 1916, following his training period.
The Advance to the Hal December 1916 to January 1917
In Mesopotamia, the 9th Battalion of the Worcestershire Regiment had seen no fighting of importance during summer or autumn 1916. The disastrous campaign for the relief of Kut had left both the opposing armies exhausted, and the heat of the ensuing months had been too severe to permit much movement of troops. Thus, both the British and Turkish armies lay quiet and waited for the cooler weather of winter.
In anticipation of the winter and of the fighting it would bring, the 13th Division, including the 9th Worcestershires, had been drawn back from the front to a training camp at Amara. Training carried on there throughout October and November, by the end of which the 13th Division was once more in good fighting trim. The move forward to the front then began. The troops marched in small columns of all arms. The 9th Worcestershire and 7th North Staffordshire, together with a Brigade of Field Artillery and a long train of transport, formed the second column of the Division and marched north-west along the river banks by easy stages, covering the miles from Amara to the front in ten days.
The march was begun on November 29 in hot sun and sand, on December 8 the last stage was completed in rain and mud, and the march ended at 'Twin Canals', a post on a desolate plain covered for the most part with six inches of muddy slush, in which the camp was pitched. Despite the dreary surroundings all were in good fettle and high spirits. 'If my men fight as they have marched', recorded an officer of the Battalion, 'they are sure to do well'. The 9th Worcestershire Regiment now mustered 29 officers and 824 other ranks; a strong battalion once more.
The position of the Turkish Army holding Kut-al-Amara was somewhat unusual. As during the previous campaign, the Turkish forces were disposed on both banks of the River Tigris. On the left, or northern bank the enemy were still holding the strong position of Sannaiyat which had defied so many attacks. On the right, or southern bank the enemy forces had been withdrawn several miles to an entrenched position close to Kut itself. The enemy's right wing was thus considerably further back than was their left wing, but the natural strength of the left wing position was very great and its communications were ensured by an elaborate system of entrenchments along the northern bank of the river from Sannaiyat to Kut.
The Turkish Army consisted nominally of five Divisions (estimated to total about 20,800 with 70 guns), but those Divisions were not up to strength and not nearly so well equipped or supplied as was the opposing British force of four strong Divisions (the 3rd Indian and 7th Indian Divisions, forming the 1st Indian Corps, and the 13th Division and newly formed 14th Indian Division forming the 2nd Indian Corps). The British were superior, both in numbers and in armament, but that superiority was not great enough to ensure success in attack unless skillfully directed. Fortunately, in Sir Stanley Maude (General Maude had received the K.C.B. for his services in command of the 13th Division in the preceding campaign) the British Army had a leader capable of making the most of the force under his command.
General Maude decided to strike at the Turkish right flank, to envelop and crush the enemy forces south of the Tigris, and then to cross the river and cut off the rest of the enemy's forces from their base. In adopting this plan he ran the risk that his own line of communications might be cut by a sally from Sannaiyat. To avert that danger, Maude trusted the strength of the British defences opposite that position and the protection afforded to his northern flank, as well as to the northern flank of the enemy, by the great Suwaikiya Marsh. However, it was essential for success that the full scope of the new plan should not be divined by the enemy; a series of bombardments and feint attacks at Sannaiyat were to be carried on while the main attack went forward on the southern side.
Such was the outline of the plan. The first stage was the envelopment of the enemy's right flank, and that operation was commenced in the middle of December.
Southwards from Kut-al-Amara runs a deep water-course, the Shatt-al-Hai or River Hai, and it runs across the low-lying plain of Mesopotamia to join the Euphrates at Nasiriya. The Hai's watercourse is dry in summer, but in January there is some water in the river bed, enough for drinking although not enough to impede a crossing. As a first move, General Maude decided to extend the left flank of his army to the banks of the Hai. To deceive the enemy as to his intentions, the British Commander ordered a heavy bombardment of the Sannaiyat position. The enemy hastily reinforced the threatened flank. Once that movement was well under way, the force detailed to seize the position on the Hai was set in motion.
To meet the possibility of such a turning movement, the Turkish right flank had been strongly entrenched at the junction of the River Hai with the Tigris. The Turkish entrenchments formed a salient, about half a mile in depth, the apex of the salient being on the watercourse of the Hai. About a mile west of that position a Turkish floating bridge spanned the Tigris.
The 13th Division was entrusted with the initial advance. The Division was to advance under cover of darkness from Dujaila to Atab, and thence to work forward up the line of the Hai to the enemy's entrenched position. Behind them the 14th Division would occupy the old Turkish position, now abandoned, between the River Hai and Dujaila. At the same time the British Cavalry would move further southward, cross the Hai at Basrugiya, and would then wheel round the enemy's position and attack the floating bridge. The subsequent sequence of events could not exactly be foreseen, but the intention was at once to begin systematic operations for the reduction of the Turkish defences on the southern bank of the Tigris.
The 9th Worcestershire Regiment, after three days rest in the camp at Twin Canals, received orders for their part in the forthcoming operations. At nightfall of December 12 1916, the 39th Brigade assembled and marched forward to Sinn Abtar. There the Brigade bivouacked in the low ground of the Dujaila Depression. In such cover the troops lay all through the next day, whilst to the right the continuous boom of guns told of the feint against Sannaiyat. Next evening, the real advance began. As soon as it was dark, the troops of the 13th Division began to move. At circa 6.00 p.m., the 39th Brigade advanced from their cover to the appointed assembly position at Imam-al-Mansur. There, the force formed up.
The plan for the advance of the 13th Division demanded careful adjustment. The 39th Brigade were to form the Divisional Reserve; in front of them the 38th Brigade would act as an advanced guard and occupy a position to cover the march of the 40th Brigade to the left, which would seize Atab and then bridge the Hai.
The advance began at 3.00 am. The 39th Brigade marched forward across country on a compass bearing, the battalions marched in lines of companies in fours, with as much silence as was possible. The ground was rough and two deep nullahs had to be crossed, but the direction was well maintained and eventually the Brigade came to a halt in its allotted position. Dawn was now lighting the sky behind them. News came from both front and flank that the other Brigades had successfully done their work. Then, at 7.00 am, came orders for the 39th Brigade to advance.
The Brigade moved forward a short distance, further orders were then issued. The 9th Worcestershire and 7th Gloucestershire would push on through the outpost line of the 38th Brigade and advance along the River Hai to Bassouia Ford, the Worcestershire on the eastern bank and the Gloucestershire on the western.
The two battalions moved off. The 9th Worcestershire passed through the outposts of the 38th Brigade, deployed into fighting formation and advanced across country by slow stages, pausing at intervals to gain touch with the Gloucestershire, who, having further to go, fell somewhat behind. British cavalry could be seen in the morning light moving across country away to the west, for the turning movement of the cavalry force through Basrugiya had been successfully accomplished. That advance of cavalry scared away Turkish outposts along the Hai and the 9th Worcestershire met no opposition; by midday the Bassouia Ford had been reached and a position established.
Meanwhile, the cavalry on the western bank had been nearing the enemy's entrenchments and orders came for the 39th Brigade to continue the advance. The 7th Gloucestershire were brought across to the eastern bank, and the Worcestershire and Gloucestershire battalions together pushed on to the ford of Umm es Sa'ad. There, the troops again dug in. They had as yet met no opposition, although firing could be heard away to their left front. Clearly the cavalry were in action and to assist them, the 7th North Staffordshire, hitherto in reserve, were sent forward. Eventually the cavalry fell back, and the attempt to advance further given up. The troops were very tired and slept on the ground they had entrenched.
The next morning on December 15 there came orders for the 38th and 39th Brigades to advance up the eastern bank of the Hai towards the enemy's entrenchments. After a sharp skirmish with some Arab snipers, the advance began about 10.00 am. The 9th Worcestershire were detailed as support to the Brigade. The troops in front of them came into action and there was heavy firing, but the 9th Worcestershire were kept back in rear till almost midday. Orders then came for two companies to be sent forward to fill a gap which had opened between the inner flanks of the two Brigades (near the 'Low Ground'). Accordingly, "C" and "D" Companies under Major Gibbon moved up to the right flank of the 39th Brigade and were put under the command of the 7th Gloucestershire.
As Major Gibbon's two companies advanced they were met by a sharp fire of shrapnel and of heavier shells, no other troops were moving at the time and consequently the Turkish artillery concentrated upon them. The Worcestershire platoons nevertheless continued their advance across the open until they were in line with the 7th Gloucestershire, who were lying deployed within 500 yards of the enemy's position. The Turkish trenches were strongly held and well protected by wire. The two Worcestershire companies came into action, fire being kept up by the Lewis guns while the remainder of the two companies dug cover with their entrenching tools.
As they lay working for dear life, the Turkish high explosive burst among the labouring soldiers and shrapnel was rained upon them. Men were hit right and left. Private J. Merritt had almost dug himself into shelter when he saw that the man next him was badly wounded and helpless. Merritt dragged the wounded man into the cover he himself had made, took the other's place in the open and commenced to dig in afresh. Merritt had joined the battalion as a recruit only four days previously, and for this action he was awarded the D.C.M. Gradually the survivors made cover for themselves, but the losses had been very heavy. Over a hundred had been killed or wounded across the two companies (1 Officer killed and 24 men, 4 Officers wounded and 82 other ranks).
While Major Gibbon's two companies had thus been under fire, the remainder of the 9th Worcestershire had moved forward and by nightfall established a support position some 500 yards behind the front line of their Brigade. By dawn next day the position of the British forces on the eastern bank of the Hai was fairly secure. The next step was to establish a proper position on the western bank, where the cavalry had been operating. It was necessary that the cavalry should be relieved before the enemy had time to organise a counter-thrust. So, the next day on 16 December, the 39th Brigade were ordered to send their supporting Battalion to establish a position on the western bank. Accordingly the 9th Worcestershire (Major Gibbon's two companies had not yet rejoined) made their way across the river bed on the Hai that afternoon and took up an outpost line on the further side. The Battalion came under distant rifle fire while crossing the river and a couple of men were hit.
That night there was a general shift of position; the 38th Brigade took over all ground east of the Hai while the 39th and 40th Brigades moved west of the Hai and took up an outpost line running south-west from a shattered heap of masonry, known as the 'Pointed Ruin', in preparation for a wheeling movement up against the Turkish positions. The 9th Worcestershire were to be on the extreme right of this line, holding the bank of the Hai by the Pointed Ruin itself. That night, "C" and "D" Companies rejoined the Battalion. All night (before joining the remainder of the Battalion, these companies were allowed two hours rest - their first rest since dawn of 16 December) the troops laboured at entrenching defensive posts along the new outpost line. The line was thinly held; the 9th Worcestershire alone held a front of 1,600 yards.
On 17 December came orders to advance. The enemy's defences straight in front were strongly held, but further to the west the enemy did not appear to be in any great force in the further loop of the river which was known as 'The Dahra Bend.' Orders were issued for the 13th Division to wheel forward its left flank to envelop the Turkish position, the wheel was to pivot on the Pointed Ruin, and all troops were to gain as much ground as possible as a preliminary to a deliberate attack.
Just north of the Pointed Ruin was a deep little nullah which ran parallel to the Turkish front line and offered a good position. Upon nightfall, the 9th Worcestershire pushed forward and seized the nullah. It proved to be about thirteen feet deep and was entrenched under a sharp sniping fire. The work was difficult, for the troops were now exhausted from lack of rest. Eventually the position held by the Battalion extended along the nullah for some 800 yards. Then the 9th Royal Warwickshire continued the line. Still further to the left were the other battalions of the 39th Brigade, the 7th North Staffordshire and 7th Gloucestershire.
During the next week the energies of the Brigade were concentrated on the work of entrenching the new position and strengthening it for defence. The position along the nullah masked the apex of the enemy's entrenched position, which was now becoming known as 'The Hai Salient' and enabled small bodies of the troops to carry out reconnaissance and minor operations against the line of the river further west; but until the Hai Salient had been reduced and the enemy-had been driven across to the other bank it would not be possible to move larger forces further west without grave risk.
The situation was precarious, and in order to give greater depth to the defence one half of the 9th Worcestershire "C" and "D" Companies under Major Gibbon were drawn back from the line on December 20 into Brigade Reserve. Those two companies were employed on the construction of rear lines of defence, including a group of large dugouts which became known as 'Worcester City'. There those two companies spent their Christmas; and there they were joined next day by the remainder of the Battalion, who had made such cheer as was possible in the front line the second Christmas spent by the Battalion under the fire of the enemy. The withdrawal of the Battalion to Worcester City proved to be preliminary to a readjustment of the position, and the establishment of a defensive flank to the left in order to afford greater security against a possible attack from the west. The enemy were now bringing troops into the broken ground on the western flank of the Hai Salient, and were establishing strong positions in the Dahra Bend.
During that period of hard work on the entrenchments there were many minor incidents. Between the British position in the nullah and the Turkish trenches at the apex of the Hai Salient the ground was rough and broken with much brushwood, which afforded good cover for snipers and an opportunity for stalking by opposing patrols. On the night of 21-22 December, a patrol of the 9th Worcestershire left the right flank of the line near the river. Five minutes of cautious advance brought them so close to the enemy's trenches that the whole Turkish line broke into a blaze of musketry, three machine-guns joining in the riot. Fortunately the patrol, lying flat, escaped loss, though the firing roused all troops for miles around. When it died down, the patrol began to make their way back. They were stalked by a hostile patrol who cut off their retreat. The Worcestershire Corporal (unfortunately the name of this brave N.C.O. is not recorded in the Battalion Diary) ordered his men to fix bayonets, and charged the enemy, who scattered. The plucky little patrol regained the British lines with no greater loss than two wounded.
That incident was typical of many such encounters, for both sides were active; the British to win their way forward and the Turks to hold their ground. Gradually, the British forces gathered strength for the decisive attack. On 28 December the losses of the Battalion were made good by a large draft (3 officers and 105 ranks). On that same day, "C" and "D" Companies were again detached and moved left to aid in the entrenchment of the new defensive flank. On the last day of the year, the remainder of the Battalion joined Major Gibbon's two companies in their new position.
Throughout the first fortnight of 1917 the gunfire of the British artillery increased in intensity, while preparations were made for a systematic attack on the Hai Salient. After a fortnight in the flanking defences (the Battalion was relieved from the flanking defences by the 37th Dogras on 11 January and marched back to Worcester City, where the Battalion remained till 16 January 16), and in reserve at Worcester City the Battalion again took over the former position on the right of the line, abutting on the banks of the Hai.
In preparation for attack on the Hai Salient, a system of trenches was prepared in front of the nullah by the Pointed Ruin. Those trenches were constructed in successive parallel lines to act as assembly trenches for the proposed attack. Their construction was pushed on with all speed, by sapping in daylight and by digging in the open at night. Digging by night was dangerous and casualties were frequent, especially among the subalterns in charge of the work. The work continued until half the gap between the Pointed Ruin and the apex of the Hai Salient had been covered. By 21 January, the new trenches were within 300 yards of the enemy's front line and assault was possible. The new trenches stretched row behind row, entitled: "Queen's Trench", "King's Trench", "Emperor's Trench". Headquarters of the 9th Worcestershire were established in the front line by the river bank. Heavy rain on 22 January postponed operations but the postponement enabled arrangements to be made even more complete.
None doubted that a hard fight was in prospect, it was certain that the enemy would make every effort to hold their position. Airmen had reported new lines of trenches under construction within the Hai Salient and it was certain that the defenders had been strongly reinforced. The enemy's strength facing the attack was estimated as follows on 21 January: Hai Salient - 3,700 and 4 guns, Kut Peninsula - 1,700 and 29 guns, Shumran Bridgehead and the Dahra Bend - 4,400 and 18 guns.
The attack was planned in two phases; a preliminary attack against the southern apex of the Hai Salient by the 39th and 40th Brigades on the western and eastern banks respectively, followed by an attack of the 38th Brigade against the Salient's eastern face. The 39th Brigade's attack on the western bank of the Hai was to be made by two battalions, the 9th Worcestershire and 7th North Staffordshire. The other two battalions of the Brigade would be ready to reinforce.
On the night of 24-25 January, the two attacking battalions concentrated in the forward trenches; by 9.00 a.m. the next morning all was ready. At 9.30 am, the British artillery opened a sudden intense bombardment against the enemy's second line defences. At 9.40 am the attacking troops scrambled over the parapets and surged forwards. According the Regimental History, 'in splendid order the waves of bayonets swept over the open, under a fierce fire of shrapnel and machine guns. Losses were heavy; over one hundred fell while crossing the open ground'.
The men lay down in front of the Turkish front line waiting for the bombardment to lift, and then dashed forward with the bayonet. There was wild shooting and bayonetting along the trench, but in a few minutes all resistance was at an end, the men quickly consolidated the position. A trench mortar had been captured but losses had been heavy, particularly in leaders; only four officers had reached the trench.
On their left the men of the 7th North Staffordshire had also entered the front line, but were heavily counter-attacked, assisted by devastating fire from a trench-howitzer. Four or five large bombs could be seen in the air at a time. Shattered by these bombs and attacks on every side, the North Staffordshire men fell back, exposing the flank of the Worcestershire men. However, under Captains Myles and Callender, the men fought on. The latter showing great bravery, remaining in command despite being mortally wounded. He refused to retire, encouraged his men, and was eventually killed, being recommended for a posthumous Victoria Cross.
The line to the left was reinforced by the 9th Royal Warwickshire, led personally by their Colonel who was killed in the advance. For a while the Turkish counterattack died down, However, at 3 pm a second counter attack developed, once more aided by the trench howitzer. The 9th Royal Warwickshire were slowly driven back, and a similar attack wore down the resistance of the Worcestershire men. Of their four officers, now only two survived (Callender and Beauchamp having been killed). Despite immense bravery - Lieutenant Ainsworth for instance mounted a Lewis-gun on top of the parapet and fired it in in the open - the position was hopeless.
At about 3.15pm ammunition ran out. The remnants of the 9th Royal Warwickshire withdrew, taking a number of leaderless Worcestershire platoons with them. The remainder of the Battalion fell slowly back, under Captain Myles V.C., occupied the British trench and prepared it for defence. It was not until after dark that Lieutenant Ainsworth came back, unscathed, carrying his Lewis-gun. Over 900 of the Brigade had fallen: the 9th Worcestershire Regiment had lost 12 officers and 327 NCOs and men killed or wounded (107 killed, 35 missing and 185 wounded according to the War Diary).
Private Bridges was one of the 9th Worcestershire men that were killed on this fateful day. He lies buried in Amara War Cemetery, Iraq, Plot XVIII A.6.
He left a wife and two very young children, who like so many in the era, would grow up never knowing their father, nor having any real memory of him.
Subject to 20% VAT on Buyer’s Premium. For more information please view Terms and Conditions for Buyers.
Sold for
£110
Starting price
£110

Watch, listen and bid as if you were in the room. Now available for auctions worldwide.
Click here to bid live
An exclusive and confidential service for the discerning collector or vendor.
View the Gallery
Download every Spink catalogue on your iPad, iPod or iPhone using free Spink app.
Download From iTunes© 2026 Spink & Son. All rights reserved.